Wet On Wet Watercolor Tutorial
To wet or not to wet ? That is the question...
Wet on wet and wet on dry are both important parts of any watercolorist's painting vocabulary. Each technique has its own specific qualities, producing very different and delightful results.
When I started watercolor painting I was vaguely aware of these two painting methods. But I have to admit, most of my painting techniques were restricted to wet on dry processes. I didn't really take the time to explore wet on wet work and how the two techniques could complement each other.
But you haven't really experienced watercolor painting until you venture into both wet in wet and wet on dry techniques.
But what's the difference ?
"Wet on wet" means that wet paint is applied to wet paper, or added to a wash of fresh wet paint.
"Wet on dry" simply means that you're applying wet paint onto dry paper, or wet paint onto an area of dry paint.
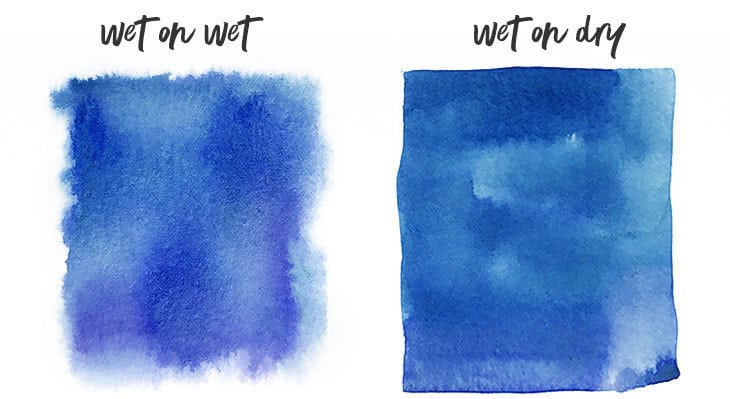
When you employ these methods together you have the freedom to create unique visual textures, and enhance your watercolor painting. Wet on wet produces soft edges, complex random effects, and beautiful color graduation. Wet on dry allows you to obtain more detail, sharper edges, and well defined shapes.
Having a good grasp of both techniques will make you a more versatile painter.
But these blending techniques are something you have to practice and get a feel for.
In this article I wanted to explore the possibilities offered by each technique, and offer some tips and advice on how to master these two fundamental skills.
The dynamics of water
Watercolor is a water based medium.
Yep… No surprises so far !
But to fully comprehend these two watercolor techniques I think it's useful to consider the traits and behaviour of water. A quick understanding of the characteristics of water will help to understand how you can control the flow of your paint.
Let's compare a drop of water onto dry paper and a drop of water onto wet paper:
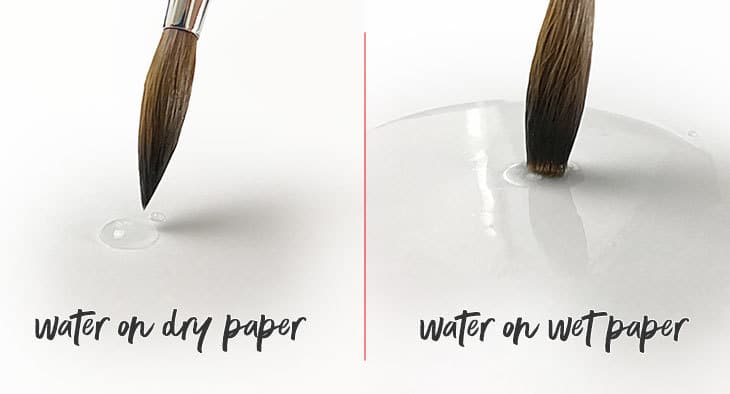
A drop of watery paint remains static and contained on dry paper. Paint does not flow unless it is invited to do so. Brushing the drop of paint will extend its surface area, but the paint remains within the shape that you define with your brush. This is what you obtain when applying a flat wash, and this is what happens when you paint wet on dry.
By comparison a drop of paint on wet paper flows onto the wet surface because water is pulled by gravity from high to low. The paint is invited to move by the wet surface - water joins with water and tends to flow toward the lowest point of the paper surface. In a nutshell, this is what happens when you paint wet on wet.
Keeping the behaviour of water in mind when painting gives you more control over the finished result. The pigments always follow the water.
Wet on dry techniques
A wet on dry painting technique tends to give you more control over your brush strokes and the applied paint. If you load you brush with wet paint and paint on dry paper you get a shape which has hard edges, but with flowing liquid paint in the middle.
When working wet on dry, watercolor doesn't flow beyond the dry edges of the form you painted, unless you push the paint around with more paint or water. This gives you full control over the shapes you paint.
With wet on dry you can produce shapes which have a uniform flat appearance, or a variegated colorwhich changes in hue and intensity. You can also obtain graduated blending which changes tonal value from dark to light.
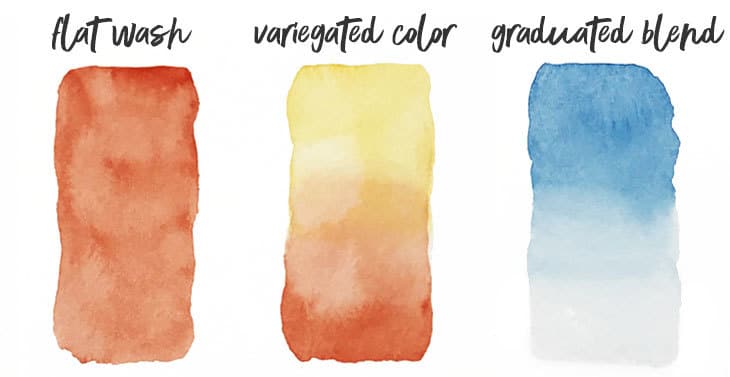
Another thing you will notice when you paint wet on dry is that your colors don't fade or bleed as much compared to a wet on wet technique. The final color appearance remains intense. This is probably because paint pigments are more diffused and spread out when painting wet into wet.
(For the following exercises you can download my worksheet and use it as a guide for practicing these two techniques - the easiest way is to use it as a template to trace onto watercolor paper).
Wet on dry flat wash
Painting watercolor wet on dry is probably the most obvious method for any watercolorist. But this kind of paint control is very important. You should practice, and then practice some more !
The first exercise is a flat wash. The objective is to get a smooth even finish across the whole surface of the square.
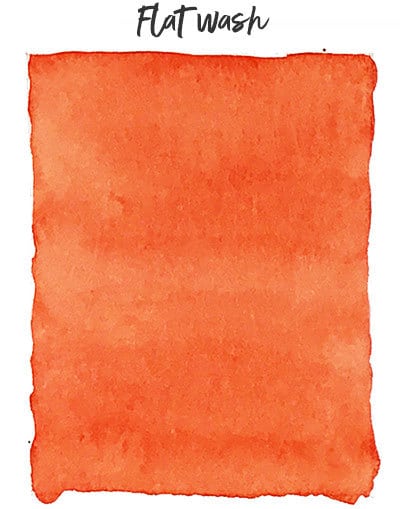
Draw a rectangle on you paper.
The trick is to load your brush with enough paint so that it flows freely. There should be enough liquid so that it forms a bead at the base of your brush stroke.
(A bead is a gathering of excess fluid at the end of a stroke or at the bottom of a wet wash).
Work from top to bottom. Tilting the paper also helps because gravity will help the paint flow downwards. The amount of paint you use is important - you really do need to keep your brush nice and wet.
You can use the bead to keep the paint flowing down the paper. Reload your brush before the wash becomes too dry and while you still have a bead at the bottom. Continue to push paint down the paper to get a consistent wash.
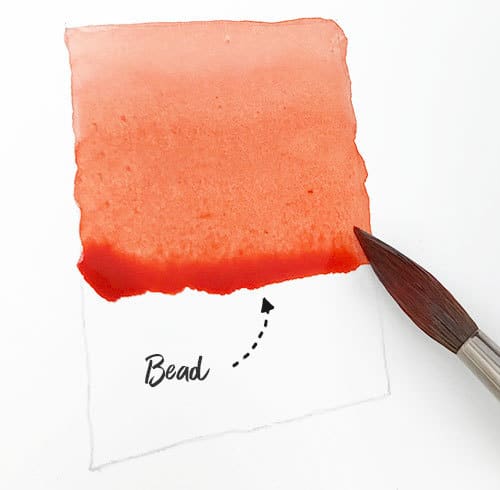
Try to keep the form of the wash within the confines of your rectangle - this is also a good exercise in brush control.
When you reach the end of your flat wash, if you still have a bead of excess paint, blot your brush to dry it, then use it to soak up the surplus paint.
Graduated blending wet on dry
Painting onto dry paper produces well defined forms and crisp edges but often you want forms to have some blending to break down those hard edges.
You do this with graduated blending.
This time you're going to paint a smooth gradient of different paint intensity from dark to light.
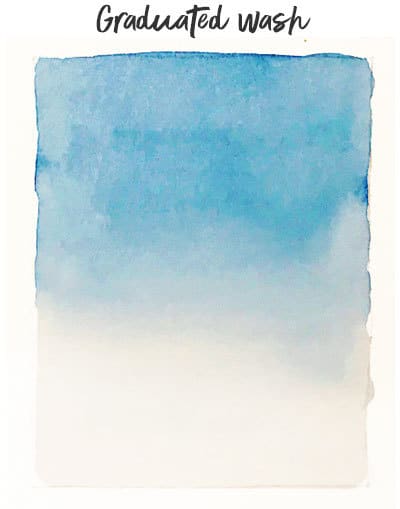
First mix a large puddle of paint. Begin with a well loaded brush and lay down some watercolor at the top of the rectangle. ( I use a small round sable hair brush for this - sable is very good at holding a large amount of paint but also forms a nice point giving you control over details. Check out some of my favorite brushes here... ). Stop about a third of the way down. There should be a bead at the base of your wash.
We want this wash to blend smoothly from top to bottom. The temptation here is to load your brush with clear water and try to expand the shape using a water loaded brush.
The problem is this tends to create a backrun and ruin the graduated blend. Your brush should not be fully loaded.
(A backrun is a feathery shaped bloom created when excess fluid flows back into a settling wash).
At this stage I find it best to dilute the paint puddle with some water, then start a new brush stroke with some diluted paint. You need to work fairly quickly while the paint is still wet. Don't use a fully loaded brush or you risk creating a backrun. Your brush should be about half loaded.
Pick up some diluted paint, blot away some of the wetness, then apply your brush stroke.
Keep doing this until the wash starts to look faded, diluting your paint until it becomes almost like clear water. To finish off you can use clear water to end the blended wash.
The trick is to work while the paint is very wet to avoid the paint from drying and getting streaks in your wash.
Variegated blending with wet on dry
When painting wet on dry you can also produce variations in color and value with one or more colors. By mixing colors this way, you get more control over your blending than with a wet on wet approach, which tends to be less predictable.
This type of blending involves glazing, where you paint on top of another layer of dry paint. You use exactly the same technique as for dry on dry graduated blending.
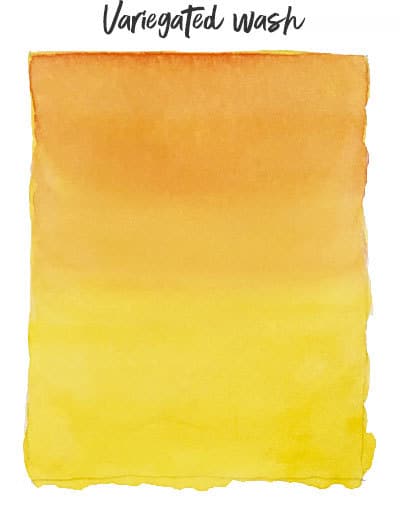
Begin by painting a flat wash, (or a graduated wash) with one color.
Let this dry.
Now choose another color and use a graduated wash technique to blend your second color over the first.
It's important that you let the first coat of paint dry, otherwise you will be painting wet in wet.
Blended shapes using wet on dry
Now that you have some practice with basic wet on dry techniques you can try combining some of the ideas above and paint some blended shapes. Wet on dry painting lets you paint sharp edged shapes because water always stops at the edge of the wet area.
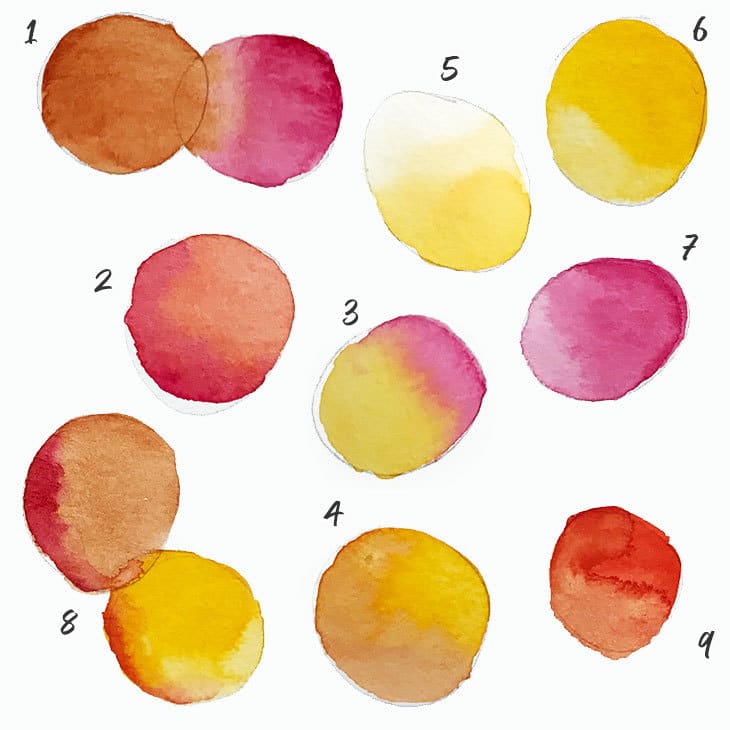
This exercise applies two techniques known as "charging" and "pulling out".
Chargingmeans injecting new color into an already wet wash. When you connect two wet shapes the colors mix together and your fresh color flows back into the adjacent wash. You can see this in examples 1, 2, 3 and 4 above.
Pulling out lets you create a gradient of color. You paint a shape, clean and blot your brush, then pull the paint pigments in a given direction. You get a progressive change in color from dark to light. You can see this in the examples 5, 6 and 7 above.
One of the most difficult parts of watercolor painting is judging the correct amount of liquid on your brush and the wetness of the paint on the paper. In example number 8 above, you can see that my first wash was too dry when I tried to charge some additional color into the first wash. And in example 9, when I tried to pull out my first shape of color, my brush was overloaded and too wet. This caused a backrun which you can see by the distinctive feathery pattern it created.
This is a fun exercise that is useful to repeat several times. It can be tricky to get the desired effects in watercolors and this is an excellent way to sharpen your skills and brush control.
Wet on wet techniques
A wet on wet technique of painting results in wonderful soft, spontaneous and complex effects which watercolors are well known for.
You begin by applying clean water to your paper to make it moist, then you lay down your color. Pre-wetting the paper in this way is sometimes referred to as priming.
Alternatively you can add more paint to an existing area of paint which is still wet.
Adding wet paint into another wet paint is known as charging. Charging in this way causes the paint to blend in a fairly random fashion.
The basic rule is that the paint will follow the water.
Wet on wet painting results in beautiful fluid effects but with less control.
But this does not mean that wet on wet painting is totally haphazard !
The main source of control is using moisture to guide and constrain paint pigments.
The wetness of the paper, and the load on your brush have a big impact on the behaviour of paint when painting with this method. You need to have a good idea how to find the right balance of wetness - paper wetness and brush wetness. Together these produce the greatest dynamic energy in the behavior of paint on paper.
Experienced watercolorists know how to control water and make it do exactly what they want.
A lot of beginners feel that watercolor is difficult to control. The unpredictability of a wet in wet technique teaches us to let go and allow the paint do what it likes rather than try to dominate it.
As usual, practice makes perfect !
The wet into wet process can be applied in a number of ways… Here are some exercises to try:
Graduated blending wet on wet
This is a basic wash technique. The aim is to paint a graduated wash which changes smoothly in tone from dark to light.
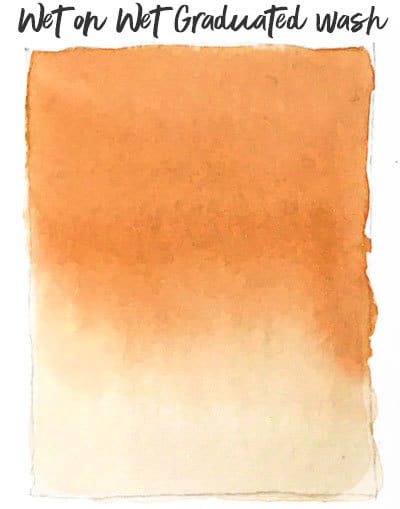
Draw a rectangle on you paper.
With a clean brush add clear water to the area to be painted. The paper should have a good sheen of wetness but should not be too wet. At the same time, if the paper is too dry you won't get a smooth wash. If you add too much water, don't worry, you can remove some moisture using a paper towel.
Load your brush (not too much) and lay down a brush stroke across the top of the wet shape. Don't pick up any more paint, just continue to apply brush strokes downward to about one third of the rectangle. It helps to tilt the paper and use gravity to pull the paint downwards.
Now clean and blot your brush, then continue to apply brush strokes towards the base of the rectangle.
Clean and blot your brush again before you reach the base of the rectangle if needed.
You'll see the pigments spread out across the wet form. Notice that the paint remains within the boundaries of your wet shape.
The trick with this kind of wash is knowing at which stage of wetness you will get a lot of pigment movement or slow paint movement. With experience you'll be able to use this to your advantage.
Variegated blending with wet on wet
This is another popular technique for mixing two or more colors together. The objective is to obtain a nice soft blend of colors.
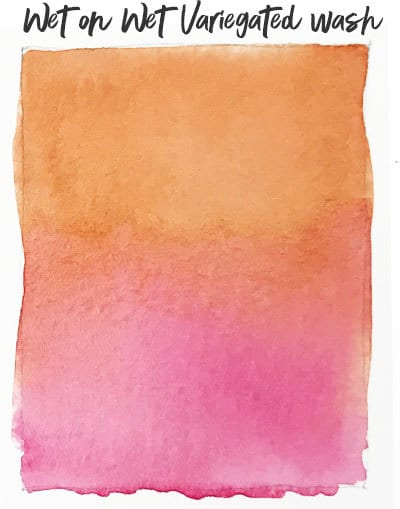
Draw a rectangle and wet your paper in the same way as before.
Load your brush with one color and apply it to one side of the rectangle. Before the paper dries, load your brush with another color and apply paint to the other side of your shape.
You can tilit the paper one way or another to help the mixing process.
The colors will mix and blend together on the paper creating a beautiful spontaneous blend of colors. The pigments mix together and can create some extraordinary new colors !
Once again the degree and speed of blending will depend on the wetness of the paper. As the paper dries, but remains moist, any new paint strokes will blend softly, but to a lesser extent.
Controlled soft shapes using wet on wet
If you first define a zone of wetness, and keep an eye on the level of paper moisture, you can get some wonderful soft edged shapes with wet on wet techniques.
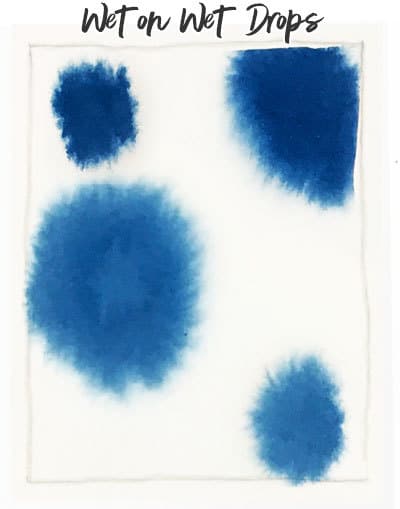
Try painting another rectangle of clear water, then dab the damp paper with paint. Depending on the amount of paint on your brush and the level of paper wetness you get diffused shapes of color.
This technique is often used by watercolorists to paint skies...
Paper wetness
As you have probably realized by now, the level of wetness of the paper has a big influence on the results produced with wet on wet techniques.
I think that learning to judge paper wetness is something which helped me take my wet on wet technique to a new level.
Artists who specialize in wet on wet painting have observed specific stages of wetness which have a noticeably different effect on paint behaviour. For example the artist Ewa Karpinska talks about the "cycle of water". Bruce MacEvoy on his website Handprint talks about the "six stages of paper wetness".
These levels of wetness range from totally soaked to completely dry, and there are between 6 and 7 specific stages of wetness. These stages exhibit the following characteristics:
-
1
Completely Wet - shiny mirror surface -
2
Glossy- very wet shiny surface but the texture of the paper is visible. -
3
Satin / low gloss - the shininess can be observed mostly in the sunken hollows of the paper texture. -
4
Moist / humid - The paper begins to look dry but is damp to touch resulting in slight paint diffusion. -
5
Matt / damp - Paper looks and feels dry, but the underlying paper still remains humid so you get a very soft paint diffusion. -
6
Dry - All moisture has evaporated and you go back to a wet on dry technique.
Experimenting with paper wetness would be a great way to develop a good feeling for the different effects obtained with varying degrees of paper moisture.
Try the exercise that I did below. Draw six rectangles side by side and begin by wetting all the shapes to the same degree. Try not to overdo it. You don't want the clear water to overflow the boundaries of your shape.
Next I loaded a brush with paint and applied a brush stroke to the top of the first rectangle.
The next part is kind of boring but important (it's a bit like watching paint dry - forgive the pun).
Observe the wetness of the shapes until they seem to reach each of the different stages of wetness from 1 to 6. When you think you're at a new stage, lay down a wash of paint and notice the difference in paint diffusion. Keep doing this until you've gone through all six stages of wetness.
Troubleshooting wet on dry and wet on wet - Blooms and Backruns
I just wanted to end with a couple of tips and problems you may encounter using bot wet on dry or wet on wet watercolor techniques.
The most common difficulty I have found is with blooms and backruns.
You've probably seen these effects at some time or another. A bloom is a feathery shape with dark edges caused when any additional liquid flows into a previously laid wash. A backrun is very similar in appearance, and is caused by a bead of excess fluid flows back into a settling wash.
These outcomes tend to occur when your wash starts to dry. The trick is not to keep adding water or paint to a wash which is starting to settle, it just makes a mess. Also, if you have a bead of paint at the end of a brush stroke, remember to blot your brush and remove the moisture to avoid a backrun as the paint begins to dry.
Wet on wet or wet on dry are both excellent techniques. Try to find ways to use them both in your next paintings. Above all, have some fun !
Wet On Wet Watercolor Tutorial
Source: https://www.watercoloraffair.com/watercolor-wet-on-wet-vs-wet-on-dry-tutorial-tips-tricks/
Posted by: goodmanwheroulatis1952.blogspot.com

0 Response to "Wet On Wet Watercolor Tutorial"
Post a Comment